Launching your own Learning Management System (LMS) doesn’t have to be daunting. With Moodle—one of the world’s most popular open-source platforms—you can offer flexible, online training to your learners. In this post, we walk you through the process of installing Moodle using Docker Compose, a fast and modern way to deploy Moodle with minimal hassle.
Why Use Docker-Compose for Moodle?
Traditionally, setting up Moodle involves configuring web servers, PHP environments, and databases. Docker simplifies this by packaging everything into containers that can run consistently across environments. Docker Compose goes a step further by managing multi-container apps—like Moodle with its database and web services—with a single configuration file.
Server Requirements for Moodle Installation
Hardware (for small to medium use cases):
– RAM: 2–4 GB minimum
– Disk space: 5–10 GB
– CPU: Dual-core or better
Software:
– Docker
– Docker Compose
Step-by-Step Moodle Installation with Docker-Compose
1. Create a project directory:
mkdir moodle-docker
cd moodle-docker
2. Create a docker-compose.yml file:
version: '3.7'
services:
  moodle:
    image: moodlehq/moodle-php-apache:latest
    ports:
      - "8080:80"
    volumes:
      - moodledata:/bitnami/moodledata
    environment:
      - MOODLE_DB_TYPE=pgsql
      - MOODLE_DB_HOST=db
      - MOODLE_DB_NAME=moodle
      - MOODLE_DB_USER=moodle
      - MOODLE_DB_PASSWORD=moodlepass
    depends_on:
      - db

  db:
    image: postgres:13
    environment:
      POSTGRES_DB: moodle
      POSTGRES_USER: moodle
      POSTGRES_PASSWORD: moodlepass
    volumes:
      - pgdata:/var/lib/postgresql/data

volumes:
  moodledata:
  pgdata:
3. Start the containers:
docker-compose up -d Installing Moodle on Different Hosting Environments
Linux Server:
– Install Apache/Nginx, PHP, and MySQL/PostgreSQL
– Download and configure Moodle
– Set permissions
– Complete installation via browser
Windows Hosting:
– Use XAMPP or WAMP
– Place Moodle in htdocs
– Open in browser at http://localhost/moodle
Cloud VPS:
– Docker or manual setup depending on provider
Once you’ve launched your Moodle environment—either locally via http://localhost or on a remote host—you’ll be guided through a setup wizard to finalize your installation.
Step-by-Step: Completing the Moodle Setup Wizard
- Access the installation wizard
Open your browser and visit the URL where Moodle is running (e.g., http://localhost:8080 or your server’s IP/domain). Moodle will automatically begin the configuration process. - Choose installation language
Select your preferred language for the Moodle interface. This can be changed later if needed. - Server environment checks
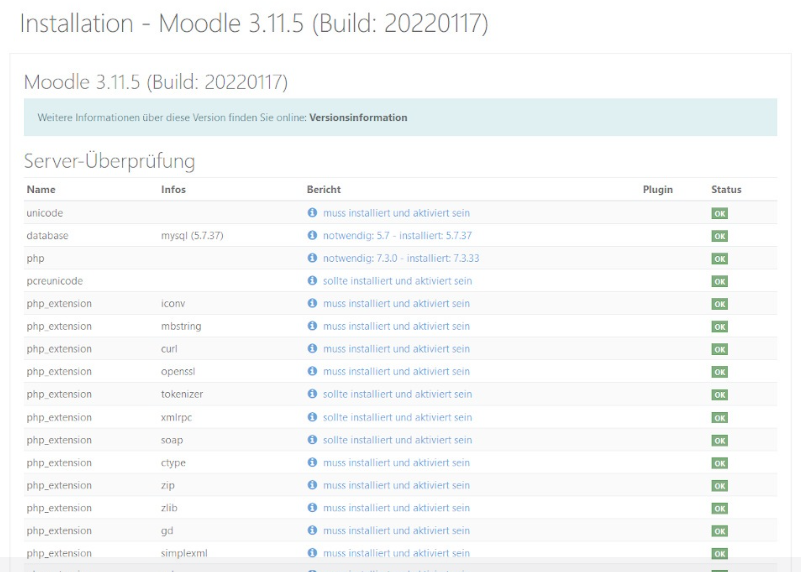
Moodle checks your PHP settings and server compatibility. You’ll see green “OK” status for each requirement.
⚠ If using plain HTTP, Moodle will issue a warning suggesting you secure your site with HTTPS for better security. - Database configuration
Depending on your deployment:- Docker setup: Database values are passed via environment variables in the docker-compose.yml file. Moodle will detect and configure them automatically.
- Manual setup: Enter details manually:
- Database type: MariaDB or MySQL
- Host: mariadb (or localhost if local)
- Database Name/User: Use the app name or .env variable
- Password: Match your MYSQL_PASSWORD
- Port: 3306 (default)
- Moodle Data Directory
Specify a path outside the web root where Moodle stores uploaded files, caches, and session data. Ensure it’s writable by the server. - Admin Account Setup
Create your first administrator account. Set a secure password and remember it—this account controls everything. - Site Configuration
Provide a name, description, and default settings for your Moodle site. These can be changed later from the admin dashboard. - Set Up Your First Course
Once installation is complete, you’ll land in the Moodle dashboard. You can immediately begin:- Creating your first course
- Adding students or educators
- Installing plugins for added functionality
What You’ll See During This Process

Next Steps
This is the second of four Moodle-related posts. It’s a technical guide on how to install and configure Moodle using docker-compose.
Stay tuned for the next posts on:
DEMANDS Project
DEMANDS is an EU-funded Erasmus+ project designed to upskill workers, enhance intercultural communication, and support workforce inclusion during the energy transition.
Project materials
Discover our collection of posters, leaflets, branding assets, and more—all designed to communicate the mission and impact of DEMANDS. Download, share, and join us in spreading the word about empowering workers and fostering inclusion in the energy transition.


